During the first ICT in Practice meeting as well as the ideas discussed in the previous posts, I looked at 10 practical tips, tricks and activities for using your IWB for getting started in creating resources using notebook. Staff from St Ivo can download the notebook file I used here (password protected – see me); however anyone who uses SMART board can access any of the special activity tools which are available from SMART in the SMART Lesson Activity toolkit (instructions for access and downloading here).
1. Highlighting Lesson Objectives
 We all know that good lessons require clear lesson objectives which are not only clear to us but to the students as well. There are various ways in which we can share our objectives with students and tools on the IWB help provide some new ideas for doing this which are also designed to help staff keep reinforcing objectives throughout a lesson.
1. The Scroll Bar tool which can be found in the SMART lesson activity toolkit can be used to keep objectives visible during a lesson, or to highlight individual objectives relevant to a particular part of the lesson, by simply being embedded at the top or bottom of a SMART notebook page.
2. Using a pull tab, objectives can remain hidden and simply pulled out from the side of the page whenever you want to remind students during the lesson of what they are working towards, or to link what you are doing to a specific learning objective. To create this there are 6 quick and easy stages:
1. Create a rectangle of the size required and shade in an appropriate colour (it will need to be given a ‘fill’ colour, even this is only white – if not, if transparent whatever is below the objectives will be shown when you pull out the tab meaning that it cannot be read clearly)
2. Write the text you want to be shown (i.e. objectives, reminders etc.)
3. Select the text by clicking on it, then hold down the ctrl (control) button and select the rectangle as well. Right click and select ‘Grouping’ and then ‘Group.
4. You then need to get the ‘Pull tab’ graphic – to select this click on the Gallery and select the lesson activity toolkit – choose ‘Graphics’ from the list and then select ‘Pull Tabs’ – if they are not shown, click on the ‘Picture and Backgrounds’ tab to show all pull tabs available. Simply choose the one you want and drag it over to the notebook page and position it next to your text box.
5. You now need to group these all together – simply select the pull tab by clicking on it, hold down control and click on the box to select it. Then right click, select ‘Grouping’ and ‘Group
6. You have now created one object which you can drag to the side with just pull showing to drag out whenever needed!
Both of these tools could of course be put to other uses – e.g. reminders of key dates, reminders regarding homework, key vocab words required during a lesson constantly scrolling round the top of a page etc!
———————————————-
2. Using Video
You can easily INSERT video files into your notebook file, however to insert them within a notebook page they will need to be in the format of a Flash Video file. You can easily convert files from their original format to .flv (Flash Video format) using the Zamzar tool. You can also use this tool to easily download useful video clips from YouTube and other online video sites which you can then use in your lessons. For full instruction of how to do this, see my other post on Capturing Digital Video.
Once you have your video file ready, simply open up SMART notebook, click on Insert, select Flash Video File.., browse to the location of your file, select and click open.
Annotating your video! If you are trying to analyse the video content, for example looking at a screenplay in Media Studies, studying character profiles in a Shakespeare play in English, looking at landform formation in geography etc. it is possible to pause the video at the point you want to talk about, discuss and add annotations to the paused clip using the SMARTboard pens. Then simply use the capture tool to take a screen shot of your annotated video – this will put a copy of the screen with the annotations into another page of the notebook. To continue watching the video, simply get rid of the annotations quickly (this can be done by selecting the eraser, circling the whole area you want to erase and double click in the middle – the annotations will disappear – you can use this trick to erase any large areas of text, drawing etc. that you don’t want!).
——————————————-
3. Using the Wordbiz tool as a starter for Vocab development
 Wordbiz is one of the interactive activities taken straight from the SMART lesson activity toolkit. To access this select the Gallery tab, then ‘Games’ and then ‘wordbiz’. This is great for testing vocabulary and a nice little starter or plenary activity. To edit and add questions, simply drag Wordbiz from the gallery to your notebook page. Then select edit and your questions and answers (you can have up to 8 questions). To play the game, students are given the question and they have to use the letters given to spell out the key word correctly in the time allowed. Good for checking both vocab development and spelling!!
————————————————
4. Using the Checker Tool as a Starter / Plenary
 This is a great little tool from the SMART lesson activity toolkit. To find it, go to the Gallery tab and select Learning Activity Toolkit – click on ‘Tools’ and then ‘Tools’ again, click on where it says ‘Interactive and Multimedia ‘ and find the checker tool – drag it across to the notebook page to use it. You can add as many as you like!
You can use these in a variety of ways – one is for adding labels to diagrams. To do this:
- Insert your diagram to your notebook page (I suggest you then lock it: select it, right click, select ‘Locking’ and then ‘lock in place’.)
- You then need to add a word box of possible labels which students can choose from. IMPORTANT – you must make sure you create each label separately so they can be dragged separately.
- Now you need to add arrows or lines to the parts of the diagram you want labelled using the line tool (again I suggest you lock these in place).
- At the end of each line / arrow, now add a checker tool. Click on the double arrow on the top left of the tool and enter the correct answer (be sure to tick whether it should be case sensitive or not) – when done click ok and repeat for the other labels
Now its ready to be used! When the correct label is dragged onto the checker tool – it will say ‘Good job’ or if wrong ‘try again’.
The example I used of labelling the ear (as shown in screen shot) is taken directly from the SMART Lesson Activity toolkit (click Gallery_Tools_Tools_Examples to find)
—————————————–
5. Using the Random Image Tool
 This enables you to collect together a set of images which will then be shown randomly when you click on the tool. There are many possible uses, for example in geography, different landforms which you want students to then explain the characteristics and formation of; in history, characters from the past that students then are asked questions about; in languages objects for students to give the translation of etc.
Again, this can be found in the SMART lesson activity toolkit (Gallery Tab_Lesson Activity Toolkit) and then click on Tools, Tools again and the random image tool is close to the end so scroll down. To edit:
- drag across the random image tool to the notebook page
- double click the edit arrow on the tool
- insert any images you want to use into notebook as normal and then drag them straight into the tool
- you can just keep dragging images on to the tool to add more.
The example in the screenshot, which I showed yesterday is available for download in the Tools_Examples part of the Lesson Activity Toolkit.
There are other great tools simillar to this in the Toolkit which are well worth exploring – e.g. random word generator, random number generator, dice etc. Enjoy!
————————————–
6. Magic Paper
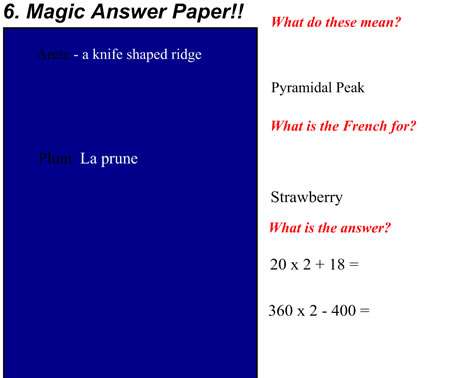
 All we are doing here is using different coloured text and backgrounds to make words or sentences visible and invisible. This is useful for setting quiz questions on the board which you can then easily go over with the class and can be put to use in many different curriculum subjects.
- Simply begin by creating a rectangle on either the left or right hand side of the page.
- Right click on the rectangle and select properties and then using “Fill Effects” choose a colour to fill your rectangle, a mid-tone colour works best. If it is too dark, black wont show up and if it is too light white wont show up, but you can play around with what works best for you.
- Create your text by the side of the rectangle – this could be quiz questions and their answers, key terms and their definitions, mathematical equations and their answers etc. You must however make sure that you create it as one selectable piece of text, do not break the question and answer into two.
- Then select the answer / definition etc. that you want initially to be invisible by highlighting it and from the font format box change the text colour to white.
-
When you then drag this over onto your magic paper, both the question and answer will appear, when you drag it back the ‘answer’ will disappear as the white text once again blends with the white background – simple!
-
————————————–
7. Using the “Order function” to create simple sorting activities

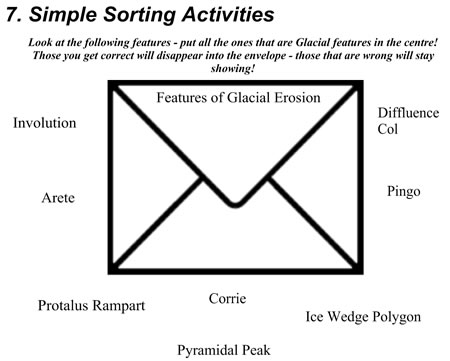
In this example I took a clipart image of an envelope and put it in the middle of my notebook page. Around the image there were names of landforms which were glacial or periglacial in origin. The aim was to sort the landforms into the two types by putting all the glacial landforms in the envelope. If students got it right the landform name would disappear when they drag it onto the envelope, if not the landform would stay visible so they drag it back. This can be adapted for any sorted activity – you could for example in english, distinguishing between verbs and adjectives and the image can be changed accordingly – for example you could have a clip art image of a post box for words to be ‘posted’!
To do this simply use the ‘order’ function. Insert your image and text – then taking each text box in turn you need to ‘order’ it. Anything that is correct and you want to disappear when dragged on to your image, right click, select ‘order’ and ‘send to back’. You are then ready for students to sort – any ‘correct’ answers that you have set to be sent to the back will disappear when you drag them over an image, whereas anything that is ‘wrong’ will stay showing.
————————————————
8. Using Multimedia
 It is easy to add a variety of multimedia to a notebook to make it more interactive and to make use of a varity of audio-visual images. Simply select the ‘Insert’ option on the toolbar, select the type of file you want to insert and you will then need to use the browse function to locate on your computer or memory pen the resource you want inserting. Remember if you are adding video files to actually be embedded in the notebook page that you will need to make sure it is in a Flash Video format (with the extension .flv). Video files can easily be converted to .flv files using software available online, for example zamzar.
In this example I inserted sound files of descriptions of weather in french, alongside images of the weather types that students had to match them up to. I used a pull tab (described in tip1 above) to provide the instructions which could be pulled out or tucked away!)
————————————————
9. Rub and Reveal
 This is a really simple technique which enables you to hide text, answers, photographs etc.. and then reveal quickly by simply moving the eraser over them. In my example I created a clozed style exercise, with a piece of text with some key words missing that students need to fill in.
- Simply insert your text, image etc. as normal.
- Select pen from the toolbar at the top, click on the formating button at the side and select Line style. Change the font colour to white (or the colour of the background you are working on) and select a thicker line depending on how big an area you want to mask.
- Then using your pen simply scrible over the word or image you want to make disappear. This will then cause it to blend with the background and to students appear invisible.
- You can then reveal the word/ image etc.. when going the exercise by simply using the eraser.
This is also a useful technique for when you want to hide small components of a page (which are too small to use the screenshade for).
————————————————
10. Image Transparency and Transparent Overlays
There are two parts to this tip, but both involve the idea of transparency.

SETTING TRANSPARENCY WITHIN AN IMAGE
The first is setting part of an image transparent so it blends with the background. This is particularly useful if using clipart. Often an image will be on a whitebackground and if you are trying to insert this on a notebook page with a coloured background you are left with your image as a square with a white background. To make the white part of your image transparent, simply insert your image (to do this select ‘Insert’ (on toolbar), followed by ‘Picture File..’ and browse for your image). Then right click on your image and from the pop-up menu select ‘set picture transparency’, this will bring up your image in a little box, on this small thumbnail image click the colour you want to make transparent (e.g. if you want the white area to not show on a coloured background click on the white) and hey presto!
2. USING TRANSPARENCY TO REVEAL IMAGE OR TEXT BELOW AN IMAGE
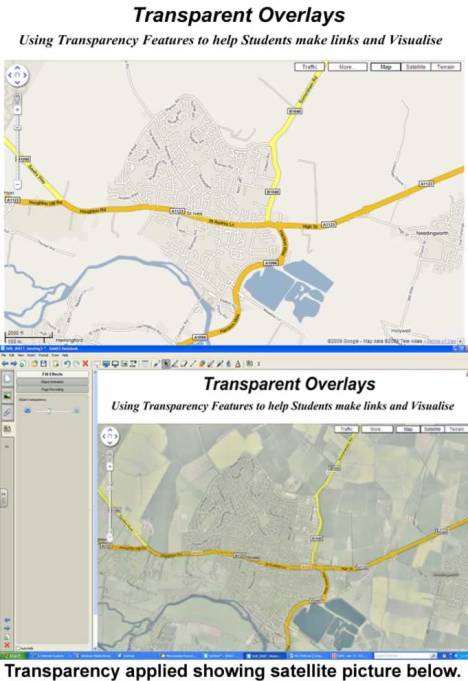
 The second part involves using the facility to control the transparency of an image which by overlaying images will enable the gradual reveal of an image below. Having followed a suggestion from Danny Nicholson I have used this to overlay a map and satellite picture of St Ives to help students studying the local area settlement unit to compare a map of the local area with the satellite image. To do this I have simply collected the two images that I want to overlay (in this instance using Google Maps). In order to ensure that the scale directly corresponded between the map and image so that the transparency option worked I ensured the size of the images were the same. I then used the ‘Order’ function to ensure the image I wanted on top was indeed in front. To do this, simply select the image showing, right click on it and from the pop up menu select ‘order’ and then select either ‘bring to
Thanks again to Danny Nicholson for the idea above. There is a useful video embedded below with Danny demonstrating this idea for the Whiteboard Challenge site
Filed under: Classroom Tools, Interactivity, IWB, SMART notebook, Video | Tagged: Digital Media, IWB, Learning Toolkit, Notebook, Tools, Video | 5 Comments »


